


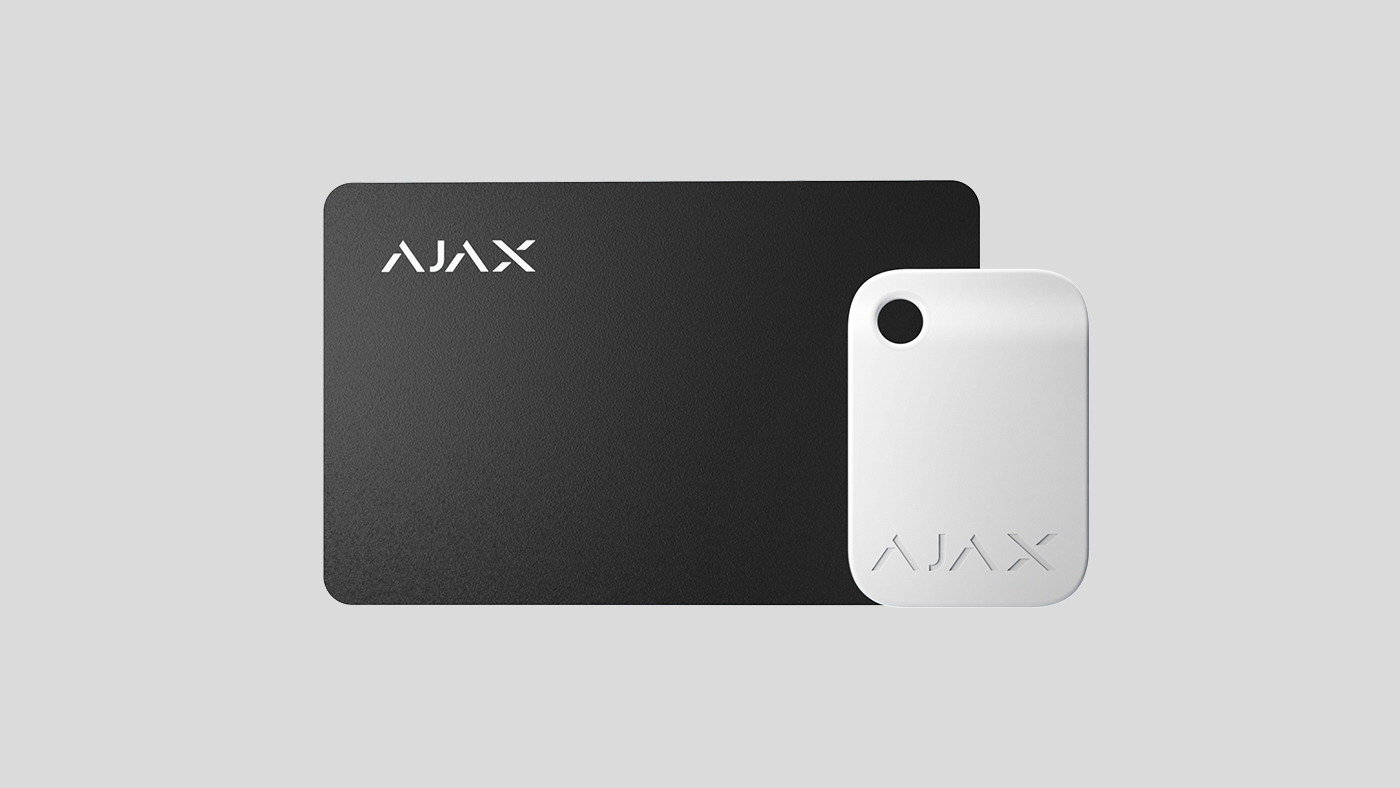
Tag and Pass are contactless identification devices for controlling the security modes of the Ajax security system. They have the same functionality and differ only in format: Tag is a key fob and Pass is a card.
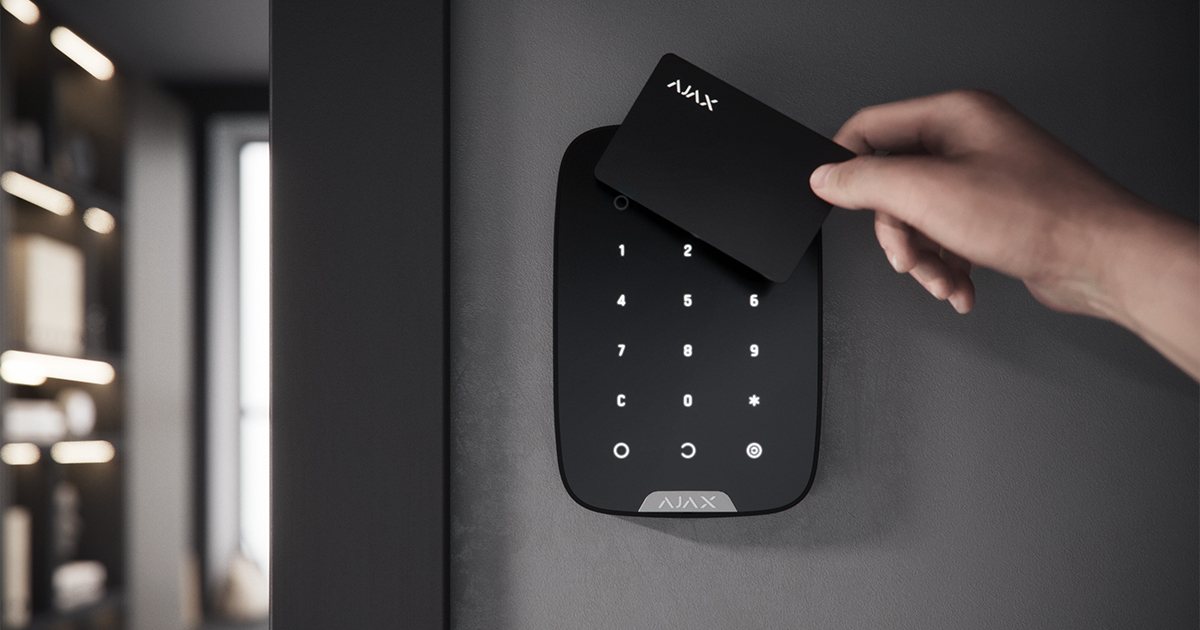
Pass and Tag only work with the KeyPad Plus .

design
1. Pass
2 day
Functional principle
To control the security of your system with Tag and Pass, you do not need to create an Ajax account, use the Ajax app or use a passcode. Simply activate a compatible keypad and present a key fob or card to arm or disarm the security system or a specific group.
The KeyPad Plus uses DESFire® technology for fast and secure user identification. DESFire® is based on the international standard ISO 14443 and combines comprehensive 128-bit encryption and copy protection.
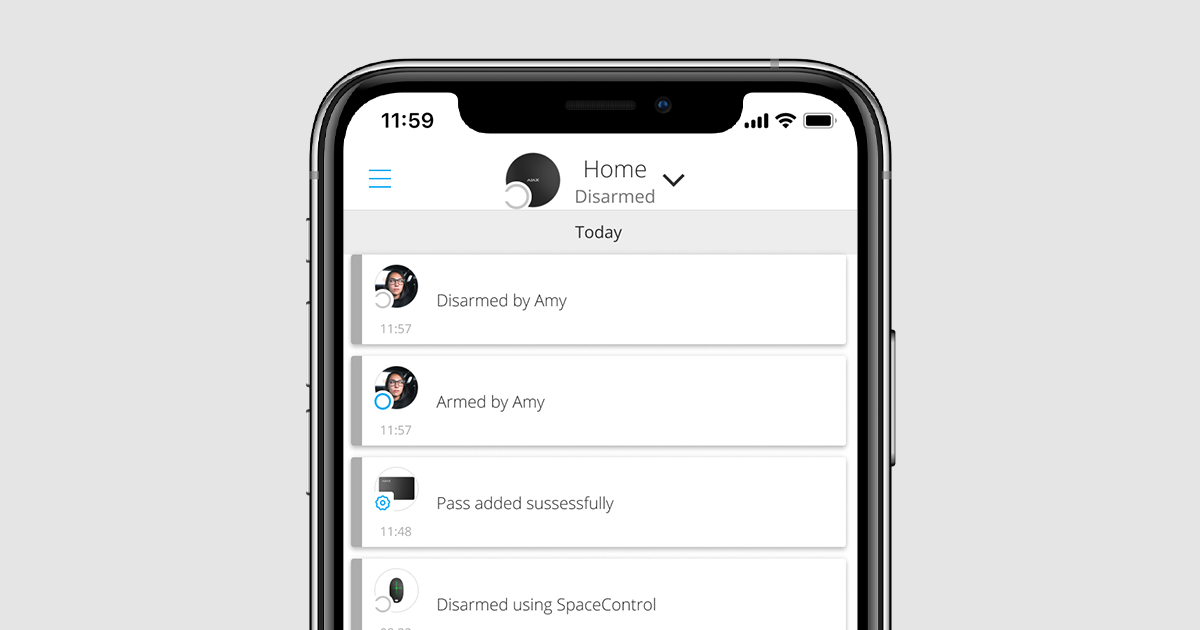
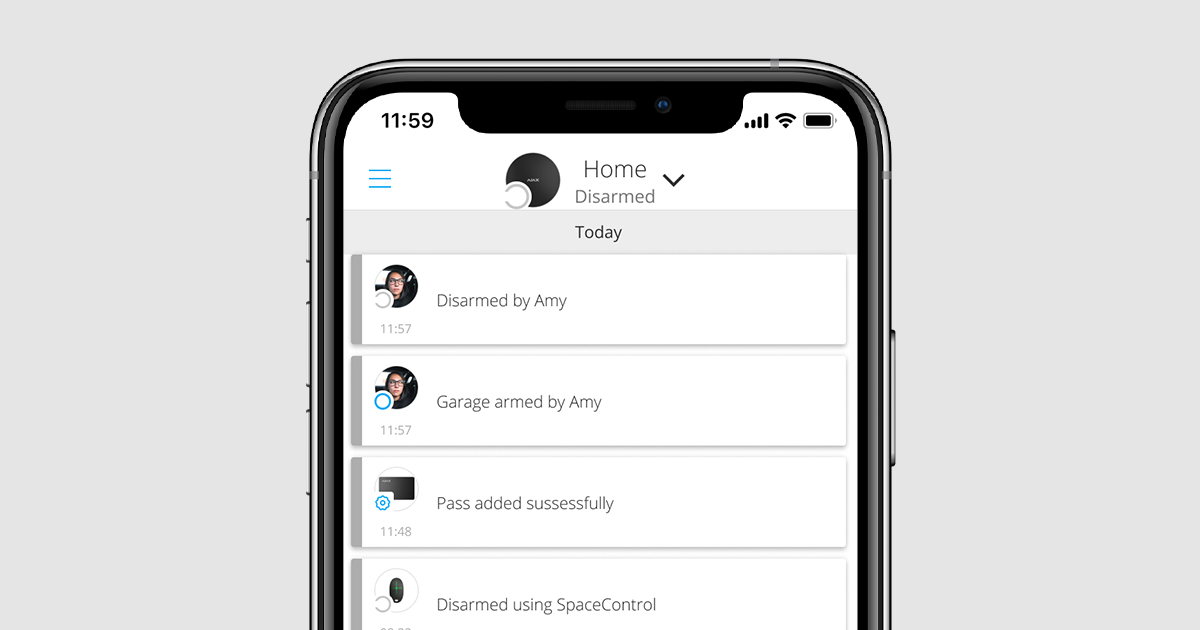
The use of the tag and pass is logged in the event history. The system administrator can revoke or restrict access rights to the contactless identification device at any time via the Ajax app.
Types of accounts and their permissions
Tag and Pass can work with or without user binding. The text of notifications in SMS and Ajax apps depends on this.
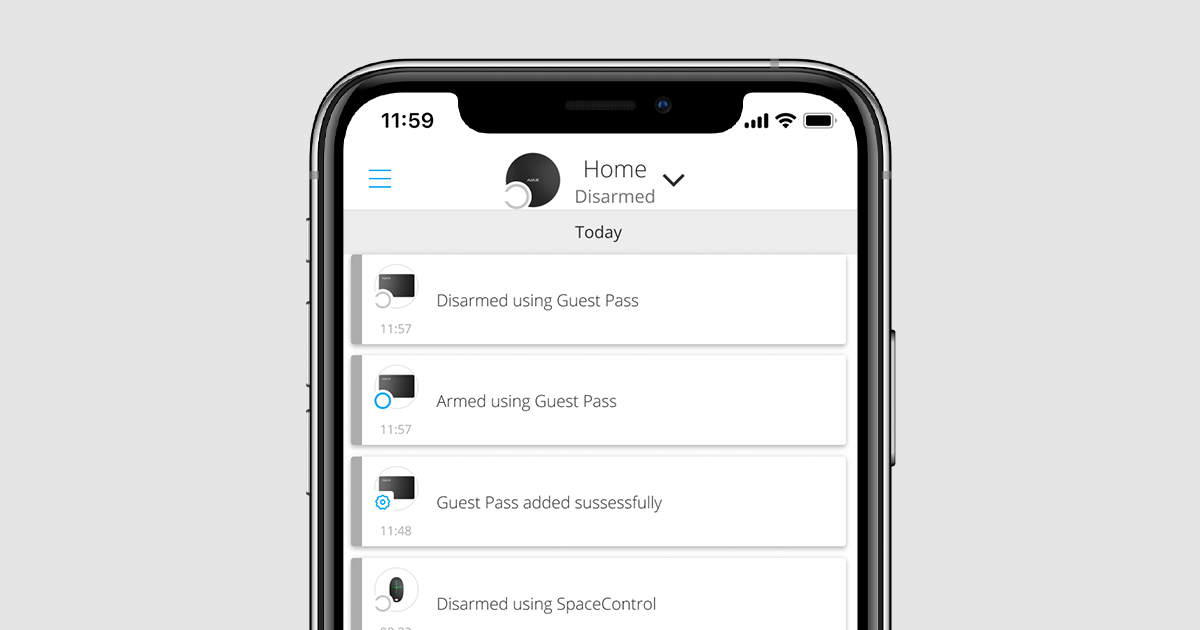
| User-bound The user's name is displayed in the event history and notifications |
| User independent The device name is displayed in the event history and notifications |
One tag or pass can be used for multiple hubs at the same time. Up to 13 hubs can be added to their device memory. Up to 13 hubs can be added to their device memory. Please note that a tag or pass must be bound to each hub individually in the Ajax app.
The maximum number of tags and passes that can be bound to a hub depends on the hub model. Tags and passes do not affect the total limit of devices in the system.
| Hub model | Number of day and pass |
| Hub Plus | 99 |
| Hub 2 | 50 |
| Hub 2 Plus | 200 |
The number of tags and passes that can be bound to a user is only limited by the maximum number of contactless identification devices on the hub. Please note that the transponders remain connected to the hub even if all keypads have been disconnected from the hub.
Transmission of events to the emergency call and service control centers (NSL)
The Ajax security system can be connected to an emergency and service monitoring center and transmit events to the monitoring center in Sur-Gard (ContactID), SIA (DC-09), ADEMCO 685 and other proprietary protocols. A full list of supported protocols can be found here .
If the tag or pass is bound to a user, the arming and disarming events are sent to the monitoring station with the user ID. If the transponder is not bound to a user, the event is delivered with the transponder ID. The transponder ID can be found in the Status menu .
Add to system
The transponders are not compatible with the Hub , third-party alarm panels and the ocBridge Plus and uartBridge integration modules. Pass and Tag only work with the KeyPad Plus.
Before adding a transponder
- Install the Ajax app . Create an account . Add a hub to the app and create at least one room.
- Make sure the hub is turned on and has access to the Internet (via Ethernet, Wi-Fi and/or cellular network). This is indicated in the Ajax app and on the hub. When the hub is connected to the network, it will glow white or green.
- The hub must be disarmed and not in the update process.
- Make sure that a compatible DESFire®-enabled keypad is already connected to the hub.
- If you want to assign a tag or pass to a user, make sure that their user account is already added to the Hub.
Only an administrator or PRO can add transponders to the hub.
How to add a tag or pass to the system
- Open the Ajax app. If you have access to more than one hub, select the one you want.
- Go to the Devices menu
 .
.  Make sure that Tag/Pass Reading is enabled for at least one keypad in the system.
 - Click Add Device .
- Select Add Card/Tag from the drop-down menu.
- Specify the type (fob or card), color, device name and user (if desired).
- Click Next and the hub will enter device registration mode.
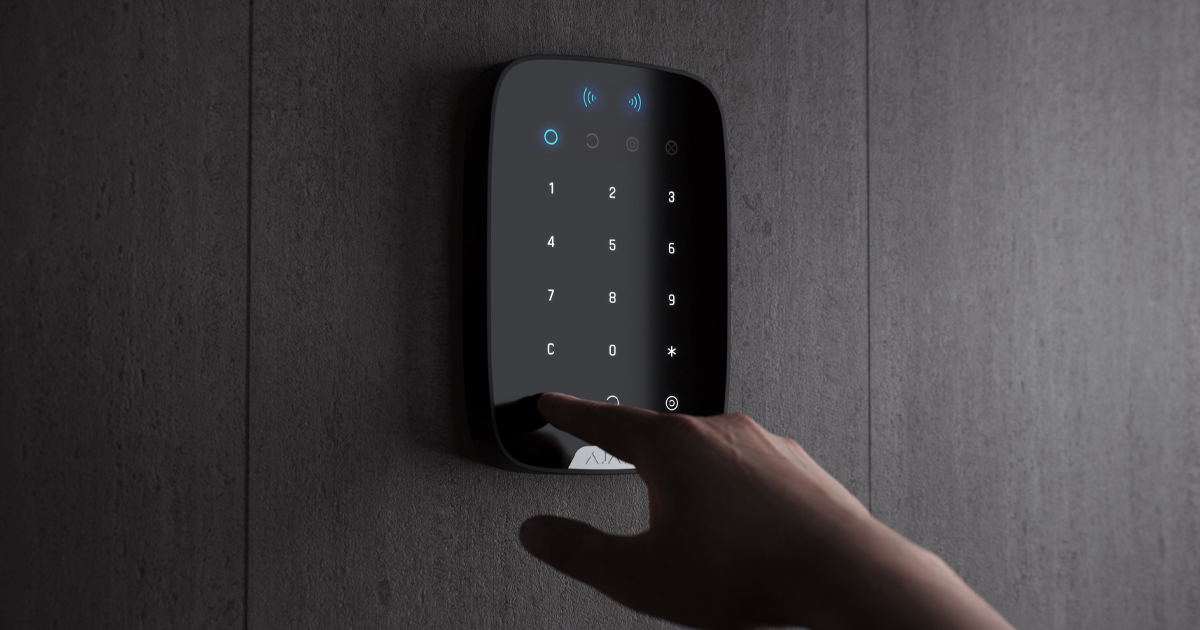
- Touch to wake up any compatible keypad with card/fob reader enabled. The keypad will beep (if enabled in settings) and the keypad backlight will turn on. Then press the disarm button
 . The keypad switches to access device registration mode.
 - Hold the tag or pass with the wide side to the keypad reader for a few seconds. This is indicated by wave symbols on the control panel. If the addition was successful, you will receive a notification in the Ajax app.
If the connection fails, try again after 5 seconds. Please note that you will be notified in the Ajax app if you try to add a new transponder even though the maximum number of tags or passes are already added to the hub.
One tag or pass can be used for multiple hubs at the same time. Up to 13 hubs can be added to their device memory. Please note that a tag or pass must be bound to each hub individually in the Ajax app.
If you try to bind a tag or pass to a hub that is already connected to the maximum number of hubs (added to 13 hubs), you will receive a notification about this. To bind such a tag or pass to a new hub, you will need to format it (this will erase all data on the card/fob).
status
The status contains information about the device and its operating parameters. The statuses of the tag and pass can be found in the Ajax app:
- Open the Devices menu .
- Select Cards/Tags .
- Select the desired pendant or card from the list.
| parameter | Meaning |
| user | The name of the user to whom the tag or pass is bound. If the transponder is not assigned to a user, the Guest field displays |
| Active | Displays the operating status of the transponder: Yes No |
| Transponder ID | ID number of the transponder Is transmitted with events to the control center |
Furnishings
Tag and pass are configured in the Ajax app:
- Go to the Devices menu .
- Select Cards/Tags .
- Select the desired pendant or card from the list.
- Go to Settings by clicking the icon
 click.
Please note that after changing the settings you must click Back to save them.
| parameter | Meaning |
| Select device type | Pendant or card |
| Color | Color selection of pendant or card: black or white |
| Device name | Appears in the device list, SMS and push notifications, and event history. The name can be up to 12 characters in Cyrillic alphabet or up to 24 characters in Latin alphabet. Click the pencil icon to edit |
| user | Select the user to bind the tag or card to. When the transponder is bound to a user, the transponder has the same rights to control security as the user Learn more |
| Security Management | Selects the arming modes and groups that can be controlled with this tag or pass. The field is displayed and active if the tag or pass is not assigned to a user |
| Active | Allows temporary deactivation of tag or pass without removing the transponder from the system |
| User Guide | Opens the Tag and Pass User Guide in the Ajax app |
| Unpair device | How to remove a tag or pass and its settings from the system. There are two ways to remove a tag and pass from the system, when they are within range and when you do not have access to them. When the tag or pass is nearby: Start the device removal process. Activate any compatible keypad. Press the disarm button |
Bind a tag or pass to a user
When a tag or pass is bound to a user, the user takes full control of the user's security modes. For example, if the user can only control one group, the bound tag or pass will only have rights to control that group.
The number of tags and passes that can be bound to a user is only limited by the maximum number of contactless identification devices in the hub.
The user's rights and permissions are stored in the Hub. Once a tag or pass has been assigned to a user, they remain linked in the system. This means that if the user's rights are changed, no further changes to the tag or pass settings need to be made as they are automatically applied.
To bind tag or pass to a user in Ajax app:
- If you have multiple hubs added to your account, select the hub you want.
- Go to the Devices menu .
- Select Cards/Tags .
- Select the day or pass you want.
- Click on the gear icon to access the settings.
- Select the desired user in the corresponding field.
- Click Back to save the settings.
If the user is deleted from the hub to which the tag or pass is bound, the system can no longer be controlled with that transponder until another user or guest access is assigned.
Temporarily deactivating a tag or pass
The tag fob and pass card can be temporarily deactivated without being removed from the system. A deactivated transponder cannot be used to control the arming mode.
If more than 3 attempts are made to change the arming mode with a temporarily disabled transponder, the keypad will be locked for a specified time window (provided the setting is enabled) and a corresponding notification will be sent to the system users and the monitoring center.
To temporarily disable tag or pass in Ajax app:
- If you have multiple hubs added to your account, select the hub you want.
- Go to the Devices menu .
- Select Cards/Tags .
- Select the day or pass you want.
- Click on the gear icon to access the settings.
- Uncheck the Active option.
- Click Back to save the settings.
If you want to use the tag or pass again, select the Active option.
Formatting a tag or pass
Each tag or pass can be added to up to 13 hubs. Once this limit is reached, the tag or pass cannot be added to new hubs until a full reset is performed.
Please note that resetting will delete all settings and associations of the key fob or card. At the same time, reset tags and passes will only be deleted in the hub that was used to perform the reset. In all other hubs, the tag or pass will still be displayed in the app, but will not be able to control the arming modes. The transponders must be removed manually from the hub.
When keypad tamper protection is enabled, if more than 3 attempts are made to change the arming mode using a reset tag or pass, the keypad will be blocked for the period of time specified in the settings.
To reset tag or pass in Ajax app:
- If you have multiple hubs added to your account, select the hub you want.
- Go to the Devices menu .
- Select a capable keyboard from the list of devices.
- Click on the gear icon to access the settings.
- Select the Reset Cards/Tags menu.
- Activate the enabled keypad. Then press the disarm button . The keyboard switches to Format Access Device mode.
- Hold the tag or pass in front of the keypad reader. This is indicated by wave symbols on the control panel. If formatting is successful, you will receive a notification in the Ajax app.
Application
Transponders do not require any additional installation or assembly. The tag keychain is easy to carry thanks to the integrated fastening hole. You can wear the tag around your wrist or neck or attach it to your keychain. The passport card does not have a fastening hole, but can be kept in your wallet or cell phone case.
If you carry the tag or pass in your wallet, do not keep other cards, such as credit cards or travel tickets, in the immediate vicinity. This could cause the transponder to stop working properly.
To change the arming mode:
- Activate the KeyPad Plus by swiping across the keyboard. The keyboard will beep (if enabled in settings) and the control panel lighting will turn on.
- Hold the tag or pass in front of the control panel reader, which is indicated by wave symbols on the control panel.
- Change the arming mode of the object or group. Please note that if the Easy change of arming modes option is enabled in the keypad settings, there is no need to press the button to change the arming mode. The arming mode will be automatically reversed when a tag or pass is used.
Using Tag or Pass when two-stage arming is enabled
Tag and Pass can be used for two-step arming, but cannot be the final device. The two-step arming process with Tag and Pass is identical to arming with a personal or shared keypad passcode.
What is two-stage arming and how can it be set up?
service
The tag and pass do not require batteries and are maintenance-free.
Technical data
| Technology used | DESFire® |
| Operating standard | ISO 14443-A (13.56 MHz) |
| Encryption | + |
| Authentication | + |
| Signal interception protection | + |
| User loyalty | + |
| Maximum number of linked hubs | Up to 13 |
| compatibility | KeyPad Plus |
| Operating temperature range | From -10°C to +40°C |
| Permissible humidity | Up to 75% |
| Dimensions | Tag: 45 × 32 × 6 mm Passport: 86 × 54 × 0.8 mm |
| Weight | Day: 7 g Passport: 6 g |
scope of delivery
- Day o Pass
- Quick start Guide.

AJAX | RFID card for AJAX KEYPAD PLUS...

AJAX | RFID card for AJAX KEYPAD PLUS...

AJAX | RFID TAG (key chain) Black
