


Hub 2 Plus is an alarm center in the Ajax security system that controls the operation of all connected devices and interacts with users and security services.
The Hub central unit reports the opening of doors, the breaking of windows, the threat of fire or flooding and automates recurring events using scenarios. When intruders enter the secured room, Hub 2 Plus sends photos from MotionCam / MotionCam Outdoor motion detectors and notifies the security service to dispatch security guards.
![]()
The Hub 2 Plus central unit may only be installed indoors.
Hub 2 Plus requires Internet access to connect to the Ajax Cloud. The central unit is connected to the Internet via Ethernet, WiFi and two SIM cards (2G/3G/4G).
Connection to the Ajax Cloud is necessary for configuring and managing the system via Ajax Apps, transmitting alarm and event notifications, and updating the Malevich OS . The Ajax Cloud service is hosted by Amazon Web Services (AWS). All data in the Ajax Cloud is stored with multi-level protection, and information is exchanged with the hub via an encrypted channel.
![]()
Use all communication channels to ensure a more reliable connection to the Ajax Cloud and protect yourself against interruptions in the telecommunications services of the respective providers.
Apps for iOS and Android, as well as applications for MacOS and Windows, allow you to manage the security system and respond quickly to alarms and notifications. The system allows you to select the events to report and the type of notification: by push notifications, SMS or calls.
If the system is connected to a security service, events and alarms are transmitted to the monitoring center — directly and/or via the Ajax Cloud .
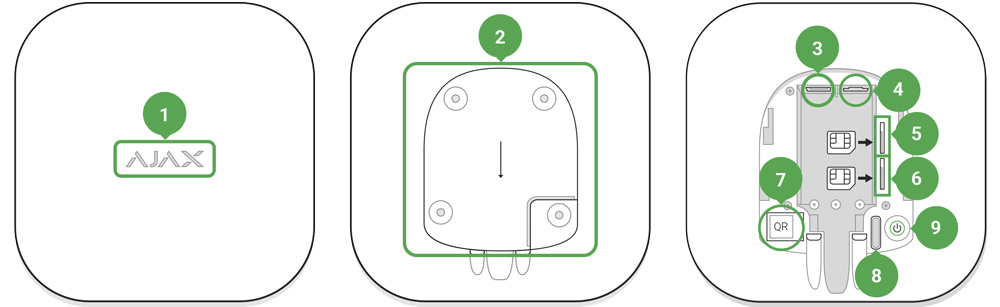
Functional elements
- Ajax logo with LED display
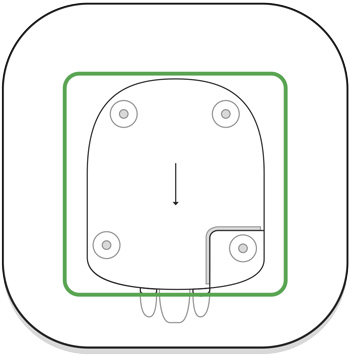
- SmartBracket mounting plate. Push down firmly to open
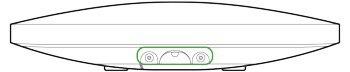
 The perforated part is required to activate the tamper protection in case of an attempt to dismantle the hub. Do not break it off.
 - Power cord socket
- Ethernet cable socket
- Micro SIM slot 2
- Micro SIM slot 1
- QR code
- Tamper protection button
- On/Off button
Functional principle
The hub monitors the operation of the security system by communicating with the connected devices via the encrypted Jeweller protocol . The radio range is up to 2000 m (open field, i.e. without obstacles such as walls, doors, ceiling structures). When the detector is triggered, the system triggers an alarm within 0.15 seconds, activates the sirens and notifies the security service monitoring center and the users.
In case of interference on the operating frequencies or attempts to interfere, Ajax switches to a free/undisturbed radio frequency and sends notifications to the security service monitoring center and to the system users.
Jamming/sabotage of a wireless security system and how to protect yourself from it
Hub 2 Plus supports up to 200 connected Ajax devices that protect against intrusion, fire and flooding and controls electrical (household) devices automatically using scenarios or manually via an app.
A separate Wings radio protocol and a specially designed antenna are used to send photos from the MotionCam / MotionCam Outdoor motion detector. This ensures that visual alarm verification can be carried out even when the signal strength fluctuates and there are communication interruptions.
Hub 2 Plus runs on the Malevich real-time operating system OS. Similar operating systems are used in control systems for spacecraft, ballistic missiles and car brakes. The Malevich OS extends the capabilities of the security system and is automatically updated without user intervention via the air or radio interface.
Use scenarios to automate the security system and reduce repetitive processes to a minimum. Set up the security schedule and program actions of automation devices ( Relay , WallSwitch or Socket ) in response to an alarm, button press or according to a schedule. A scenario can also be created mobile in the Ajax app.
Creating and configuring a scenario in the Ajax security system
LED display
The Ajax logo on the front of the hub lights up red, white or green – depending on the status of the power supply and the Internet connection.
| Event | LED display |
| At least two communication channels — WLAN, Ethernet or SIM card — are connected | Lights up white |
| Only one communication channel is connected | Lights up green |
| The hub is not connected to the Internet or there is no connection to the Ajax Cloud server | Lights up red |
| No electricity | Lights continuously for 3 minutes and then flashes every 10 seconds. The color of the indicator depends on the number of connected transmission channels. |
AjaxAccount
The security system is configured and controlled via Ajax apps . Ajax applications are available for professionals and users for iOS, Android, MacOS and Windows.
The settings of the Ajax security system users and the parameters of the connected devices are stored locally on the hub and are inseparably linked to it. If the hub administrator changes, the settings of the connected devices are not reset.
To configure the system, install the Ajax application and create an account . The phone number and email address can only be assigned to one Ajax account when creating it. There is no need to create a new account for each hub - several hubs can be managed using one account.
![]()
Your account can combine two roles: administrator of one hub and user of another hub.
Safety requirements
When installing and operating the Hub 2 Plus, strictly follow the general safety regulations for the operation of electrical equipment and the requirements of the statutory regulations on electrical safety.
It is strictly forbidden to disassemble the device when it is live. Do not use the device with a damaged power cord.
Connecting to the network
- Remove the SmartBracket mounting plate by pushing it down with force. Avoid damaging the perforated part — it is essential for activating the tamper protection when dismantling the hub.
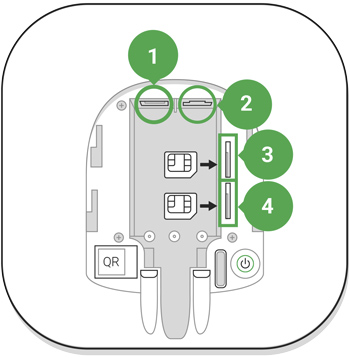
- Connect the power and Ethernet cables to the appropriate sockets and install the SIM cards.
1 — Power connection
2 — Ethernet port
3, 4 — Micro SIM card slots - Press and hold the power button for 3 seconds until the Ajax logo lights up. It takes about 2 minutes for the hub to update to the latest firmware and connect to the Internet. A green or white logo indicates that the hub is working and connected to the Ajax Cloud.
 If the Ethernet connection is not established automatically, disable the proxy and MAC address filter and enable DHCP in the router settings. The hub will be assigned an IP address automatically. After that, you can set up a static IP address of the hub in the Ajax app.
 - To connect to the cellular network, you need a micro SIM card with the PIN code request disabled (you can disable it using a mobile phone) and sufficient funds on your account to pay for services at your operator's rates. If the Hub cannot connect to the cellular network, configure the network parameters via Ethernet: roaming, APN access point, username and password. Contact your telecom operator for assistance in selecting these options.
Adding a hub to the Ajax app
- Turn on the hub and wait until the logo lights up green or white.
- Open the Ajax app. Allow access to the requested system functions to fully utilize the capabilities of the Ajax app and not miss any notifications about alarms or events .
- Open the Add Hub menu and select the type of registration: manual or menu-guided step-by-step. If you are setting up the system for the first time, use step-by-step instructions.
- Enter the hub name and scan the QR code below the SmartBracket mounting plate or enter it manually.
- Wait for the hub to be added. The connected hub will appear in the Devices tab
 .
.
After adding a Hub to your account, you become the administrator of the device. Administrators can invite other users to the security system and set their permissions. The Hub 2 Plus central unit can be used by up to 200 users.
Changing or deleting the administrator does not reset the settings of the hub or the connected devices.
User permissions in the Ajax security system
Hub Center Status
Symbols
The icons show some of the statuses of Hub 2 Plus. You can see them in the Ajax app in the Devices menu ![]() .
.
| Symbols | Value |
| 2G connected | |
| 3G connected | |
| LTE connected | |
| SIM card not installed | |
| The SIM card is defective or has a PIN code | |
| Battery charge level of Hub 2 Plus. Display in 5% increments | |
| Hub 2 Plus malfunction is detected. The list is displayed in the Hub center status list | |
| The hub is directly connected to the security service monitoring center | |
| The hub is no longer directly connected to the security service’s monitoring center |
status
Statuses are listed in the Ajax app :
- Open the Devices tab .
- Select Hub 2 Plus from the list.
| parameter | Meaning |
| Disturbance | Open with a click on |
| Mobile signal strength | Shows the signal strength of the cellular network for the active SIM card. We recommend installing the hub in locations with a signal strength of 2 to 3 bars. If the signal strength is too low, the hub cannot dial in or send SMS about an event or alarm |
| Battery charge | Battery level of the device. Displayed in percentage Display of battery level in Ajax apps |
| Housing cover | Status of the tamper protection before dismantling the hub: Closed — the hub's housing cover is closed Open — the hub has been removed from the SmartBracket What is tamper protection? |
| External power supply | External power supply connection status: Connected — the hub is connected to an external power supply Disconnected — no external power supply |
| Connection | Connection status between Hub and Ajax Cloud: Online — Hub is connected to Ajax Cloud Offline — Hub is not connected to Ajax Cloud |
| Mobile communications | The hub's connection status to the mobile network: Connected — the hub is connected to Ajax Cloud via mobile Internet Disconnected — the hub is not connected to Ajax Cloud via mobile Internet If the hub has enough funds on the account or bonus SMS/calls, it can make calls and send SMS messages, even if the Disconnected status is displayed in this field |
| Active | Displays the active SIM card: SIM card 1 or SIM card 2 |
| SIM1 | The number of the SIM card in the first slot. Copy the number by clicking on it |
| SIM2 | The number of the SIM card in the second slot. Copy the number by clicking on it |
| WIRELESS INTERNET ACCESS | Internet connection status of the hub via Wi-Fi. To increase reliability, it is recommended to install the hub in locations with a signal strength of 2 to 3 bars |
| Ethernet | Hub Internet connection status via Ethernet: Connected — the hub is connected to the Ajax Cloud via Ethernet Disconnected — the hub is not connected to the Ajax Cloud via Ethernet |
| Average noise level (dBm) | Noise power level at the hub installation location. The first two values indicate the level at Jeweller frequencies and the third at Wings frequencies. The acceptable value is -80 dBm or less |
| Monitoring station | The status of the direct connection of the hub to the security service monitoring center: Connected — the hub is directly connected to the security service monitoring center Disconnected — the hub is not directly connected to the security service monitoring center If this field is displayed, the security service uses a direct connection to receive events and alarms from the security system What is a direct connection? |
| Hub model | Hub model name |
| Hardware version | Hardware version. Update not possible |
| Firmware | Firmware version. Can be updated mobile |
| ID | ID/Serial Number. Also located on the device box, on the device board and on the QR code under the SmartBracket mounting plate |
Rooms
Before linking a detector or device to a hub, create at least one room. Rooms are used to group detectors and devices and increase the information content of notifications. The name of the device and room is displayed in the text of the security system event or alarm.
Creating a room in the Ajax app:
- Open the Rooms tab
 .
. - Click Add Room .
- Give the room a name and optionally attach a photo or take a photo: This will help you quickly find the room in the list.
- Click on "Save .
To delete the room or change its avatar or name, tap/click on ![]() the room settings .
the room settings .
Registering detectors and devices
![]()
The hub is not compatible with the uartBridge and ocBridge Plus integration modules.
When you add a hub to your account using the step-by-step instructions, you'll be prompted to enroll devices to the hub, but you can decline and return to this step later.
Adding a device to the hub in the Ajax app:
- Open the room and select Add Device .
- Name the device, scan the QR code (or enter it manually) and select a group (if group mode is enabled).
- Click Add — the countdown to adding a device begins.
- Follow the instructions in the app to register the device.
Please note: In order to register the device with the hub, it must be within the radio range of the hub (on the same protected object).
Hub settings
Settings can be changed in the Ajax app :
- Open the Devices tab .
- Select Hub 2 Plus from the list.
- Open with a click on
 the settings .
![]()
Please note that after changing the settings, you should click the Back button to save them.
Reset settings
Resetting the hub to factory settings:
- Turn on the hub if it is turned off.
- Delete all users and technicians from the hub.
- Press and hold the power button for 30 seconds — the Ajax logo on the hub will start flashing red.
- Delete the Hub from your account.
![]()
Resetting the hub does not delete any connected users.
Event and alarm notifications
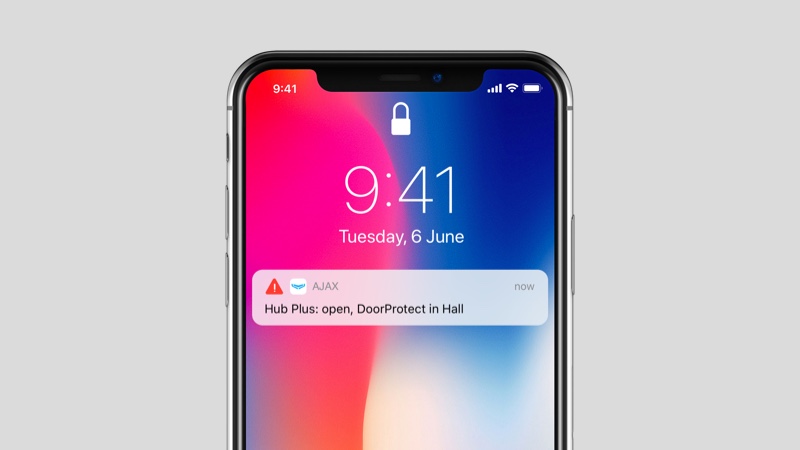
The Ajax security system informs the user about alarms and events in three ways: push notifications, SMS and phone calls. Notification settings can only be changed for registered users.
![]()
Hub 2 Plus does not support calls and SMS using VoLTE (“Voice over LTE”) technology. Before purchasing a SIM card, please make sure that it only supports the GSM standard.
| Types of events | Purpose | Types of notifications |
| Disturbances | Loss of connection between device and hub Radio interference (jamming) Low battery in device or hub Covering Tampering alarm | Push notifications SMS |
| alarm | Intrusion Fire Flood Loss of connection between hub and Ajax cloud server | Calls Push notifications SMS |
| events | Activation of WallSwitch , Relay , Socket | Push notifications SMS |
| Arming/disarming | Arming/disarming entire objects or groups Activate night mode | Push notifications SMS |
![]()
The hub does not notify users about the activation of opening detectors in disarmed mode - even if the doorbell function is enabled and configured. Only the sirens connected to the system report the opening.
How Ajax notifies users about messages
Video surveillance
Video Player
00:00
00:10
You can connect third-party cameras to the security system: Seamless integration with IP cameras and video recorders from Dahua, Hikvision and Safire has been implemented. You can also connect third-party cameras that support the RTSP protocol. Up to 100 video surveillance devices can be connected to the system.
![]()
The hub does not notify users about the activation of opening detectors in disarmed mode - even if the doorbell function is enabled and configured. Only the sirens connected to the system report the opening.
Adding a camera to the Ajax security system
Connect to a security service
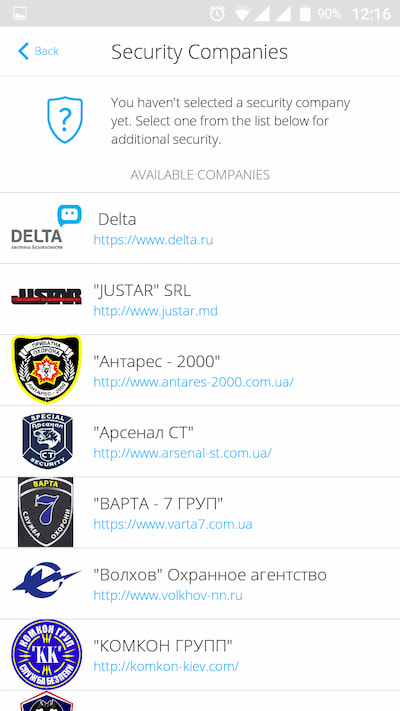
The list of companies that connect the system to their monitoring center can be found in the Security Companies menu ( Devices ![]() → Hub → Settings
→ Hub → Settings ![]() → Security company ):
→ Security company ):
Select a security service and click Send monitoring request . After that, the security company will contact you and discuss the conditions for connecting to your facility. Or you can contact a security service yourself (contact details available in the app) to arrange a connection.
The connection to the control center (NSL) is made via SurGard (Contact ID), ADEMCO 685, SIA (DC-09) or other proprietary protocols. A complete list of supported protocols can be found here .

installation
Before installing the hub, make sure you have chosen the optimal location and that it complies with the requirements of this manual. The hub should not be directly visible.
Make sure that the communication between the hub and all connected devices is stable. If the signal strength is too low (one bar), we cannot guarantee stable operation of the security system. Take all possible measures to improve the signal quality. At the very least, the hub should be repositioned, as even a 20 cm shift can significantly improve signal reception.
If the device has a low or unstable signal strength, use a signal-boosting wireless repeater .
When installing and using the device, observe the general electrical safety regulations for the use of electrical devices and the requirements of the legal regulations on electrical safety. It is strictly forbidden to disassemble the device when it is live. Do not operate the device with a damaged power cable.
Installation of the hub:
- Attach the SmartBracket mounting plate using the screws provided. If you use other fasteners, make sure they do not damage or deform the plate. We do not recommend using double-sided tape for installation: it may cause a hub to fall down in case of impact.
- Attach the hub to the mounting plate. After installation, check the tamper protection status in the Ajax app and then the quality of the plate attachment. You will receive a notification if an attempt is made to remove the hub from the surface or from the mounting plate.
- Attach the hub to the SmartBracket mounting plate using the screws provided.
Make sure that the hub is mounted in the correct position (e.g. on a wall). If it is mounted correctly, the Ajax logo can be read horizontally.
Do not place the hub in the following locations:
- Outdoors (outdoors).
- Near or inside metal objects or mirrors that cause attenuation and shielding of the signal.
- In places with high levels of radio interference.
- Near sources of radio interference: less than 1 meter from the router and power cables.
- In any room where temperature and humidity are outside the acceptable range.
maintenance
Regularly check the Ajax security system's operability. Clean the hub housing from dust, cobwebs and other contaminants. Use a soft, dry napkin suitable for equipment maintenance.
Do not use products containing alcohol, acetone, gasoline or other active solvents to clean the hub.
Changing the battery in the hub
Package contents
- Hub 2 Plus
- Mounting plate SmartBracket
- Power cable
- Ethernet cable
- Mounting kit
- Starter pack — not available in all countries
- Quick start guide
Technical data
| Classification | Security system control panel with support for Ethernet, WLAN and two SIM cards |
| Support for detectors with photo verification of alarms | Available |
| Number of connected devices | Up to 200 |
| Number of connected ReX | Up to 5 |
| Number of sirens to be connected | up to 10 |
| Number of security groups | Up to 25 |
| Number of users | Up to 200 |
| Video surveillance | Up to 100 cameras or DVRs |
| number of rooms | Up to 50 |
| Number of scenarios | Up to 64 Learn more |
| Communication protocols of the monitoring center | SurGard (Contact ID) SIA (DC-09) ADEMCO685 Other proprietary protocols NSL software with support for alarm photo verification List of supported protocols |
| Power supply | 110–240 V~ with pre-installed battery 6 V⎓ with alternative 6V PSU power supply unit |
| Built-in accumulator | Li-Ion 3 Ah Provides up to 15 hours of battery life when using a SIM card |
| Energy intake from the grid | Up to 10W |
| Tamper-proof | Available, tamper alarm |
| Radio communication protocols with Ajax devices and detectors | Jeweller — for transmitting events and alarms. Learn more Wings — for transmitting photos. Learn more |
| Radio frequency band | 866.0 – 866.5MHz 868.0 – 868.6MHz 868.7 – 869.2MHz 905.0 – 926.5MHz 915.85 – 926.5MHz 921.0 – 922.0MHz Depends on the sales region. |
| RF transmit power | 10.4 mW (limit 25 mW) |
| Radio range | Up to 2000 m |
| Communication channels | 2 SIM cards 2G (GSM900/DCS1800 (B3/B8)) 3G (WCDMA 850/900/2100 (B1/B5/B8)) LTE (FDD B1/B3/B5/B7/B8/B20/B28) WLAN (802.11b/g/n) Ethernet |
| Operating temperature range | From -10°C to +40°C |
| Operating humidity | Up to 75% |
| Dimensions | 163 × 163 × 36mm |
| Weight | 367g |
| lifespan | ten years |

AJAX HUB 2 PLUS - Wireless alarm...

AJAX HUB Starter Pack (White)

AJAX HUB 2 PLUS - wireless alarm...

AJAX HUB 2 PLUS - wireless alarm...

AJAX HUB 2 PLUS - Wireless alarm...

AJAX HUB 2 PLUS - Wireless alarm...

AJAX HUB 2 PLUS - Wireless alarm...

AJAX HUB 2 PLUS - Wireless alarm...

AJAX HUB 2 PLUS - Wireless alarm...

AJAX HUB 2 PLUS - Wireless alarm...

AJAX HUB 2 PLUS - Wireless alarm...
