


ABUS Server as a free DynDNS service | Remote access = (re)establish remote access | Connect Secvest and ABUS Server
# Secvest Touch wireless alarm system (FUAA50500)
Reading time: approx. 12 minutes
For stable remote access to the Secvest alarm center via the Internet:
- either the Secvest must be connected to the free ABUS server,
- or there must be a fixed external IP address for the home network.
Remote access can be done:
- either via Internet browser to the Secvest web interface ,
- or via Secvest app .
You can find more information about the technical background here .
Remote access is useful, for example, if the residents of a single-family home are away for a longer period of time (on vacation, etc.) and an alarm occurs. Using remote access, a user can then deactivate or (re)activate the Secvest, for example.
You can also restrict access to the Secvest to your home network using the web interface or the Secvest app.
For such access, e.g. via WLAN/Wi-Fi, a correspondingly shortened network configuration is sufficient, see table of contents.
requirements
In order to set up and operate permanent remote access to a Secvest wireless alarm system via an Internet browser or Secvest app, the following requirements must be met:
- A broadband Internet connection via DSL, TV cable or fiber optic at the location of the alarm center (recommended: with an external IPv4 address ).
- A functioning home/private/internal network consisting of, for example, a PC and router at the location of the alarm center.
- Access data for the router's user interface to create port forwarding.
- A specific free internal IPv4 address from the corresponding address range of the router, for connecting the alarm center to the home network, if not already done.
- The alarm control panel is connected to the router via a network cable or Secvest WiFi module , which provides the connection to the Internet.
- An email address (to confirm your ABUS Server account details).
- The Secvest has been put into operation .
- The user name and code of the installer .
- The “Display Text” of the Secvest comprises a maximum of 16 characters and does not contain any umlauts or special characters.
- The “Web Server” function is activated/enabled .
- To access the installer mode using the web interface if necessary: The “Web Access” function is activated/enabled .
Set up ABUS server account
The ABUS server provides you with a free DynDNS service .
A DynDNS service is mandatory to keep the Secvest accessible for access via the Internet for more than one day if there is no permanently fixed external IP address on site.
For external access (= remote), the corresponding device (e.g. a smartphone from which a user wants to access the alarm center via the Secvest app) must know the current external IP address of the local home network.
Virtually all Internet providers disconnect the Internet connection for a short time every night in order to give the Internet connection a new IP address , unless explicitly agreed otherwise in the contract.
From the moment of disconnection or with the new external IP address, external access would no longer be possible, as a previously connected device (e.g. a smartphone) does not know the new IP address.
The DynDNS service supplements the home network, so to speak. It does not provide external devices with a possibly changing IP address , but rather a fixed so-called host name = a fixed Internet address.
Secvest can be reached from outside at all times via this fixed Internet address.
Create account and login
- Open the web page : www.abus-server.com
- Enter a user name for your new free ABUS server account. Important: max. 8 characters, no special characters, lowercase.
You will need this user name later to access/log in to your ABUS server account.
- Enter your email address to confirm your login details later.
- Confirm the statement “I am not a robot.”
- Once you have read the terms of use , please accept them by checking the appropriate box.
- Click the Sign In button.
You will then receive an email to the email address you provided.
(If the email is not in your inbox, please also check your spam folder.)
The email contains a temporary password for your ABUS Server account and a link to activate your account.
Click on the activation link to activate your ABUS Server account
Your ABUS Server account is now created, activated and ready to use.
info
The Secvest automatically adds itself as a device to the ABUS server as soon as all settings have been made as described below.
It is not possible to create the Secvest manually.
- Now log in to the ABUS server for the first time under “Login” with your access data (= your ABUS server user name and the temporary password sent to you by email).
This will bring up the “Welcome” screen.
info
If you have forgotten your password or no longer have it, you can have a new password sent to your email address by clicking on the “Forgotten password?” button (on the “Login” screen).
To do this, you must enter your ABUS server user name .
Edit account
- To edit your account, for example to change your password as recommended, click the "Edit Account" button
This will bring up the “Edit Account” screen.
- If necessary: Change the stored email address or language here.
- If necessary: Use the “Delete account” button to remove your account and all connected devices from the ABUS server database.
Notice
When you delete your ABUS server account, all connected users (installers and end customers) immediately lose their remote control option via Internet browser and Secvest app (= remote access).
- To change your password, click the “Click here to change your password” button.
- Now choose your personal password . This must contain at least 6 characters. Important: It must not contain any special characters or umlauts.
Notice
If you want or need to change your password later during operation , you should immediately enter this new password in the settings of the corresponding alarm center(s) in order to ensure virtually uninterrupted remote access.
- Click the Save button to apply the settings.
Make network settings
If the Secvest alarm center is not yet configured for communication in the internal/private/home network, you must now do this with the next steps before continuing with the setup in the router.
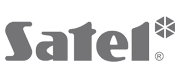
Configuration for private/home network
- Now is the latest time to connect the Secvest alarm control panel to the router via a network cable or a Secvest WiFi module , which is also used to connect to the Internet.
- Log in as an installer , e.g. using the Secvest web interface .
- Go to Installer Mode > Communication > Network > Network Setup .
- We recommend that you leave the “DHCP” function deactivated or deactivate it to avoid possible problems with the permanent connection of the alarm center to the Internet.
- If “DHCP” is deactivated as recommended: Enter the (internal) “IP address” of the Secvest alarm control panel.
- Enter the “IP subnet mask” . In private networks this is usually: 255.255.255.0
- Under “Gateway IP Address” enter the (internal) IP address of the router through which the Secvest should connect to the Internet.
- Select an “Internal HTTP Port” for the Secvest, e.g. 80.
- Enter 4433 as the “Internal HTTPS Port” of the Secvest.
- If you only use one router in the network, enter the (internal) IP address of the router through which the Secvest should connect to the Internet under “DNS Primary IP Address” .
- Click the Apply button to save the settings.
 FUAA50xxx_Installer_Network_DHCP_Off_ABUS_Server_Off
Make port sharing in the router
Information on how to create a port forwarding for this router and the current router software version can be found in the support portal or the user manual of the corresponding device manufacturer.
- Create a port forwarding using the router's user interface and use:
- Internal HTTPS port of the Secvest: 4433 (= factory setting)
- External port: freely selectable, either 4433 or another free port, e.g. 50000.
Make a note or remember this setting for further configuration of the Secvest. - Protocol: TCP
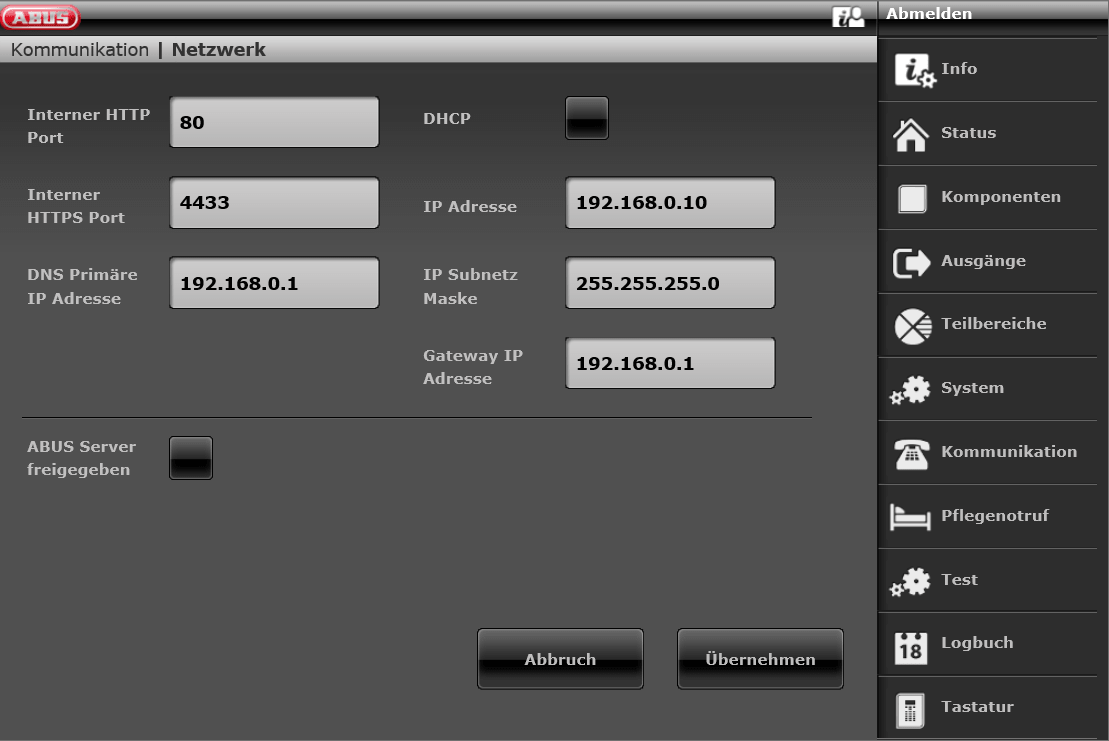
Configuration for automatic connection of Secvest and ABUS Server
After you have created an ABUS server account and made the settings on the router, you now have to make the final network settings for the Secvest.
- Go to Installer Mode > Communication > Network > Network Setup .
- If the alarm center is not yet configured for communication in the internal/private/home network, you must now do this in this mask, as described previously.
- (Then) enable the connection to the ABUS server by checking the corresponding checkbox.
- Enter the external port under “External HTTPS Port” that you have set up in the router for this function.
- Enter your ABUS server user name and your ABUS server password .
- Click the Apply button to save the settings.
- Exit the installer mode.
 FUAA50xxx_Installer_Network_DHCP_From_ABUS_Server_released
info
The Secvest now automatically logs on to the ABUS server and adds itself as a new device.
Please note that this process may take up to 15 minutes .
The connection between Secvest and ABUS server or the DynDNS server is now complete.
This means that the Secvest can be permanently accessed externally via the Internet using the web interface or the Secvest app (= remote access).
You are not allowed to create the Secvest manually using your account on the ABUS server. It is not possible to create the Secvest manually.
Checking the connection
- Open the website : www.abus-server.com
- Log in to the ABUS server under “Login” with your ABUS server user name and your ABUS server password .
The Secvest will now automatically appear as a device in your account.
If this is not the case, please check the troubleshooting points listed at the end of the document.
There are several options available to you to access the Secvest web interface directly using the ABUS server .
Option A)
- Click the link in the Hostname column.
Variant B)
- Click the device name .
This opens the “Device information” screen.
info
The “Connect” button does not currently have any function on the Secvest.
An HTTP connection is opened there by mistake.
- Open a browser , such as Firefox.
- In the address bar, enter the host name , then a colon and then the HTTPS port of the Secvest , following the pattern: https://hostname:HTTPS-port
This will take you to the alarm center’s web interface .
The following applies to all variants: The browser may display the message “Connection/certificate is not secure”. This does not mean that the connection to Secvest is insecure.
- In this case: Add an exception to the browser.
Reasons if no connection is established
Alarm center does not log on to the ABUS server
- The display text of the control panel is longer than 16 characters.
As soon as the Secvest alarm control panel is connected to the ABUS server, its display text may contain a maximum of 16 characters and no special characters or umlauts. - The user name and password for your ABUS Server account contain special characters or umlauts.
- The Secvest was already connected to at least one other ABUS server account.
The MAC address of the alarm center is then already stored on the ABUS server.
In this case: Delete the alarm control panel from the other account or have ABUS Support do this. - Outdated firmware is installed on the alarm panel.
You can get the latest firmware version here . We recommend making a backup of the settings beforehand. - The network settings in the Secvest are incomplete (DNS, etc.).
- The Internet broadband connection is a DS-Lite connection and only has an external IPv6 address .
Alarm center logs on to the ABUS server, but the status indicator does not light up green
- The alarm center was created manually as Ultivest via your ABUS server account.
In this case: Remove these settings/systems from your ABUS server account by clicking on the “Delete device” button.
If you have made the network settings in the Secvest as described above, the system automatically logs on to the ABUS server and adds itself as a new device.
Please note that this process may take up to 15 minutes. - The port forwarding/redirection in the router is faulty.
If necessary, contact the relevant manufacturer support.