How do I manage/operate/program/configure/control the Secvest? Use the local user interface and web interface of the Secvest.
# Secvest Touch wireless alarm system (FUAA50500)
Reading time: approx. 8 minutes
The Secvest wireless alarm system can be completely managed/operated or programmed/configured and controlled using the local user interface (= display and control panel on the housing of the alarm control panel).
The Secvest web interface contains almost the same functionality .
Both options are part of the basic controls .
Only by using the two basic controls you can access:
- The installer enters the installer mode .
- The Level 4 user to the Level 4 options .
- Administrators in the Advanced User Menu (= Administrator Menu).
- Normal users in the user menu .
In addition, a variety of optional controls are available to administrators and normal users.
info
Depending on the local conditions, it is recommended to use additional or optional control elements.
In order to make it difficult for a burglar, for example, to manipulate/sabotage the Secvest, the alarm center is ideally installed:
- in a difficult to access position or …
- hidden or …
- in a room that is additionally secured.
Using the optional control elements, you can specifically control individual functions, such as activating/deactivating the alarm control panel using the Secvest wireless control unit, Secvest wireless remote control or Secvest app.
requirements
In order to fully manage the Secvest wireless alarm system using the local user interface , the following requirements must be met:
- The alarm center has been put into operation .
- The installer code (= installer password).
- The main administrator code (= password of the main administrator or “user 001”).
In order to manage the Secvest wireless alarm system using the web interface, the following additional requirements must be met:
- The “Web Server” function is enabled.
- To enter the installer mode: The “Web Access” function is enabled.
- The alarm center is connected to the home/internal/private network, consisting of, for example, a PC and router.
- The IP address of the Secvest in the home network is known or the free ABUS IP Installer is installed on the PC/laptop.
- A browser (e.g. Firefox).
- The installer user name .
- The main administrator username .
- For remote access via the Internet: The home network or the Secvest is connected to the Internet .
Local user interface
The Secvest wireless alarm system can only be put into operation using the local user interface (= display and control panel on the front of the alarm control panel).
In addition, the local user interface offers the possibility to manage the Secvest during normal/ongoing operation.
- The local user interface of the Secvest consists of the following hardware:
- the display = shows the status of the alarm panel and guides you through the installer mode and the (advanced) user menu .
- the confirmation buttons (dot symbols) = are used to log in and exit the modes/menus as well as to navigate within the modes/menus.
- the navigation buttons (arrow symbols) = are used to navigate within the modes/menus and trigger a restart when pressed simultaneously for 5 seconds.
- The "Internal Activation" button (house symbol) = is used for internal activation , whereby the Secvest only monitors the outer shell of the property. The alarm control panel therefore blocks out signals from motion detectors in the property.
- The "Activate" button (closed lock symbol) = directly activates sub-area 1 if only this is configured. If several sub-areas are configured, a corresponding query starts.
- the "Deactivate" button (open lock symbol) = directly deactivates sub-area 1 if only this is configured. If several sub-areas are configured, a corresponding query starts.
- the numeric keypad including the star key and the hash key = is used to enter codes, names, phone numbers, etc.
- the microphone (small opening on the side of the alarm panel housing, approximately at the height of the display) = used to record location messages, voice messages and voice memos
Display
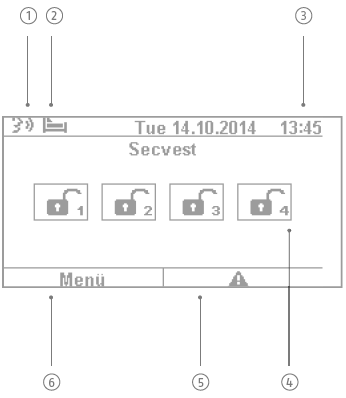
The display is divided into the following areas:

1) Voice prompt/Voice memo: This icon appears when a user has recorded a voice memo .
2) Activity Monitoring: This symbol appears only when a detector is programmed for the activity monitoring feature.
This function is used to monitor people in need of assistance/care.
info
This function requires professional configuration by an installer who has also provided detailed information about its exact functionality.
3) Time and date: The display shows the time and date. You must set both values manually during commissioning. During operation, the Secvest can obtain the date and time from an NTP server .
4) Status of up to 4 sub-areas:
- Lock open = system deactivated
- Lock closed = system activated
- House symbol = system activated internally
5) Safety instructions: This symbol appears in messages from the alarm center in connection with triggered alarms, necessary resets, existing faults, etc.
The more detailed description of the message only appears on the display when you enter a code from access level 2 (administrator or normal user) or access level 3 (installer).
The message will disappear from the display after acknowledgement/confirmation by any user. The message will automatically disappear from the display after one minute.
6) Menu: This field indicates that by pressing the left confirmation key plus entering the corresponding code you can access the (advanced) user menu or the installer mode .
Confirmation and navigation keys (“cursor control”)
Managing the Secvest within the different menus/modes is mainly done using:
- Confirmation buttons (each marked with a dot) and …
- Navigation keys (“arrow keys” up and down).
These four buttons are located directly below the display.

Use these keys to select menus/modes or symbols, confirm or reject values/entries, and exit the corresponding menus/modes.
The function of the two confirmation buttons adapts dynamically to the text on the display.
Example
If “Menu” appears on the left side of the display, as a normal user click on the confirmation button below and then enter your code.
This will take you to the user menu and you can exit the menu again by pressing the same key.
If you want to restart using the navigation buttons “Up” and “Down”, press both buttons simultaneously for more than 5 seconds.
Only for Secvest Touch (FUAA50500): If you want to start the cleaning mode , press the two confirmation buttons at the same time.
Numeric keypad / Numeric control pad / Number pad
The numeric keypad is used to enter values into certain data fields.
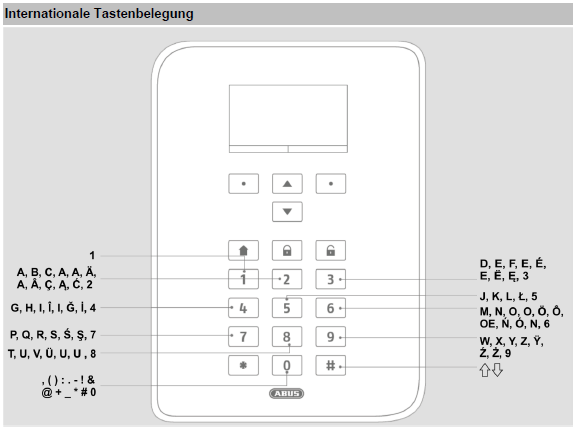
In addition, the number keys also contain letters and special characters that you need to enter user names or email addresses, for example.
For better clarity in daily operation, the letters/special characters are not printed on the numeric keypad.

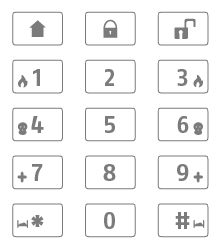
Furthermore, the number keys or symbol keys are used to manually trigger alarms ( double key function / quick alarm):
- “Fire alarm” >> Press buttons 1 and 3 simultaneously
- “Panic alarm” >> Press buttons 4 and 6 simultaneously
- “Medical emergency call” >> Press buttons 7 and 9 simultaneously
- “Nursing emergency call” >> Press * and # keys simultaneously

info
The “double button” function requires professional configuration by an installer who has also provided detailed information about its exact functionality.
Enable and disable using the Local User Interface
You can find out how to activate and deactivate Secvest here .
Contents Firmware (= Secvest software) on the local user interface
Depending on the user type or login data you use to log in to the local user interface, you will have access to :
- the user menu (for normal users)
- the Advanced User Menu (= Administrator Menu for Administrators)
- the installer mode (for installers)
Level 4 user options (for Level 4 users) can only be accessed via the web interface.
Information about the user types, their basic rights, as well as the corresponding “codes” or passwords to access the menus/modes/options can be found here .
Contents Extended user menu (= administrator menu) or user menu
The (Extended) User Menu contains the main menu items on the local user interface:
- User = edit your own user, e.g. change code and user name .
Only in the Advanced User Menu (= Administrator Menu):
Create new users or remove/delete them or edit them to a certain extent, e.g. change user type or assignment to sub-areas.
Create user “Threat Code” . - Voice memo = e.g. record a short reminder for another user
- Hide zones = serves to activate despite open zone (= detector)
- Outputs On/Off = used to switch user-defined outputs or connected devices
- Configuration = here you set or execute:
– Chime
– Voice announcement
– Activity monitor
– Display contrast
– Backlighting
– Announcement of zone names
– Restart alarm center (only in the administrator menu)
– Key tones
– Date & Time (only in the administrator menu)
– Edit outputs (only in the administrator menu)
– Remote controls (edit and remove/delete; only in the administrator menu)
– Volume settings (only in the administrator menu)
– Web access (only in the administrator menu)
– Remote update (only in the administrator menu)
– Schedules active/inactive (only in the administrator menu)
- Contacts = used to create contacts for communication in the event of an alarm (only in the administrator menu)
- Test = used to test components and functions (only in the administrator menu)
- Logbook = used to save and track relevant actions including date and time
- Info = is used to determine the current firmware version and to check the communication paths Analog/PSTN, GSM/GPRS and Ethernet/IP (only in the administrator menu)
Contents Installer mode
The installer mode includes the main menu items on the local user interface:
- Components = used to add, edit and remove:
– Detectors ( IP zones , radio zones , wired zones)
– Wireless control units
– Outdoor sirens
– Indoor signaling devices
– Indoor sirens/info modules
– etc.
– Door locks
– RF Repeaters
- Outputs = used to add, edit and remove:
– Wire outputs
– Radio outputs
– Combined outputs
- Sub-areas = used to individually configure up to 4 sub-areas
- System = is used to configure various functions:
- Language
– Display text
– Reset to factory settings
– Power grid disruption
– Installer name and code
– User access (e.g. double keys , hide all and much more)
– User reset (zone alarm, zone sabotage and system sabotage)
- Confirmation
– Hardware
– Security (e.g. supervision , remote updates , forced activation and much more)
– Upgrade center (= update alarm center)
– Check for upgrade?
- Restore Backup
– Report (only on the web interface)
- Communication = serves all settings that the Secvest needs for external communication
– Network
– NSL Reporting
– Emergency care call
– Voice dialer (recording the location message and the voice message(s) is only possible using the local user interface)
– SMS
– Email
– Comm. Options (= communication options, e.g. (delayed) response to faults, remote control by telephone)
– Contacts (for recipient data such as telephone number, SIP user ID, and/or email address)
- Nursing emergency call = used to configure activity monitoring
- Test = used to test components, functions and communication channels
- Logbook = used to save and track relevant actions including date and time (only on the web interface: save and print)
- Info = is used to determine the current firmware version and to check the communication paths Analog/PSTN, GSM/GPRS and Ethernet/IP (only in the administrator menu)
Secvest web interface
The Secvest web interface offers almost the same functionality as the local user interface (see previously described).
In many cases, managing Secvest (e.g. programming/configuring functions and creating contacts) is even more convenient using the web interface than using the local user interface.
To enter data, instead of the control panel and the display of the local user interface, simply use the mouse , the keyboard (or alternatively the virtual keyboard included in the web interface itself) and the screen of your PC/laptop. Or, for remote access, your smartphone, for example.
You can find out how to access the Secvest web interface using an Internet browser here .
Contents Firmware (= Secvest software) on the web interface
Depending on the user type or login data you use to log in to the web interface, you will have access to :
- the user menu (for normal users)
- the Advanced User Menu (= Administrator Menu for Administrators)
- the installer mode (for installers)
- the Level 4 user options (for Level 4 users)
In contrast to the previously described structure and content of the local user interface, the web interface only displays the status of the Secvest after logging in using the corresponding user name and password or code.
In the (extended) user menu, after logging in, you will immediately see, in the top right, the symbols for:
- Internally activated = house symbol
- Disabled = Open lock symbol
- Enabled = Closed lock symbol
The symbol that represents the current status of the alarm center is highlighted and blue.
The "Status" mask shows detailed information in the (extended) user menu and in the installer mode, e.g. on the individual sub-areas (which can also be activated and deactivated individually (internally)) and, if available, e.g. messages about faults or open zones.
The “Keyboard” mask also offers a “virtual control panel” that displays almost the complete functionality of the local user interface or the corresponding menu/modes.
You can only access the Level 4 user options using the web interface (and the Level 4 user login data). The main function of access level 4 is the remote update of the alarm control panel via the Internet (= remote).
You can find out how to activate and deactivate Secvest here .
Information on the different user types “Installer”, “Level 4 user”, “Administrator” and “Normal user”, as well as the corresponding “codes” or passwords and “user names” (including “Installer name” and “Level 4 user name”), can be found here .


