


Put the light camera into operation | Commissioning via Bluetooth | See the first live image
# ABUS WLAN light outdoor camera (PPIC46520)
Reading time: approx. 4 minutes
Video running time including assembly instructions: approx. 6 minutes
After downloading the App2Cam Plus from your app store (for Android devices in the Google Play Store or iOS devices in the Apple App Store ) and opening the app for the first time, the commissioning wizard starts automatically . It guides you step by step until you get the first live image from your ABUS WLAN light outdoor camera.
The commissioning wizard contains additional help texts, e.g. on how to install the camera.
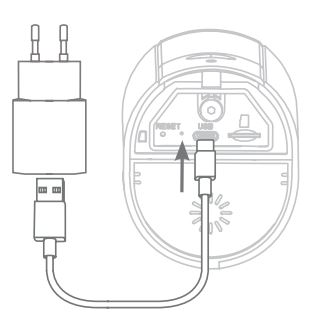
As shown below: Alternatively, you can temporarily power the camera via a socket using your own mobile phone charger (5 V, 1 A) and the included USB-C cable in order to commission it via the app.
In very rare cases, the camera or app does not complete the commissioning process correctly. In such a case: first reset the camera to the factory settings and then restart the commissioning process.
System requirements
- Activate Bluetooth in the settings of the mobile device you are using to commission the device.
- For optimal operation, the camera and the smartphone/tablet must be as close to each other as possible, a maximum of 3 meters apart.
- For optimal operation, location services must be activated in the settings.
- Your Wi-Fi network must have a password and encryption. The Wi-Fi password can contain a maximum of 31 characters. The following special characters are not allowed:

- If you haven’t already, download the free App2Cam Plus app to your phone or tablet.
Before commissioning
- Open the bottom black cover on the camera using the included Allen key.
- Screw the included antenna into the corresponding connector on the back of the camera.
- For a temporary power supply, as described below: Have a standard mobile phone charger plug (5 V, 1 A) ready.
Commissioning via App2Cam Plus
Follow the steps as shown in the video or described below.
(To view videos via YouTube, accept website cookies if you haven't already done so. You can access the cookie settings via the menu on this website.)
- Start the App2Cam Plus.
- Select “Add new device”.
- In the next step, choose one of the two options…
- Option 1: Scan the QR code located in the camera base.
- Option 2: Select your camera model from the list in the app.
- Select “Commissioning via Bluetooth”.
- If you haven't already done so, activate Bluetooth in the settings of your mobile device and return to App2Cam Plus.
- Then tap “Next”.
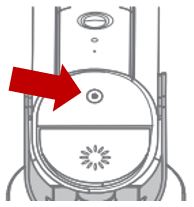
- Now supply the camera with power (temporarily using its own power plug and the included cable), and then wait about 2 minutes until the status LED on the bottom of the camera flashes 2x briefly and 1x long.
- Then tap “Next” in the app.
- Select your camera based on the identification number displayed. (If the app displays multiple cameras/numbers: You can find the identification number (DID) in the box that came with the camera and also under the QR code that is located in the camera base.)
- Then tap “Next”.
- Select your home network/Wi-Fi in which you want to operate the camera permanently.
- Then tap “Next”.
- Enter the password of your Wi-Fi network.
- Then tap “Next”.
- Now assign a security code and an admin password and remember them well. The code and password must be identical when setting up via Bluetooth connection. (You can change the security code and admin password at any time after commissioning.)
- Then tap “Next”.
The camera will now restart. This may take up to 60 seconds.
- Confirm the firmware version notice.
Next, the “Camera Overview” appears with a first preview image of your security camera.
- Tap the preview image to open the “Live View” and see the first live image.
Below the live image you will find several quick actions and you will be taken to the camera settings .
The camera has now been commissioned.
During operation, App2Cam Plus starts with the "Camera Overview" . The memory with the recordings and the app settings including general information can be accessed via the menu bar at the bottom of the screen.
You can find instructions on how to mount the camera in the video, the quick guide and the user manual .
Find out how to check if a firmware update is available to keep your security camera up to date here .